Pages

Monday, January 31, 2022

Honey Bee Stamps - Inspired by Kelley's class

 So I managed to catch the live card class in the Honey Bee Stamps Facebook group a few weekends ago, taught by Kelley Kohout. I loved it - great pace and great inspiration.

I didn't have the same stamp set or dies as she used, but I used some from my stash and copied the card design.


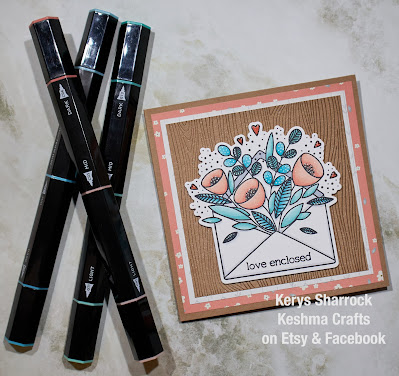
I used Honey Bee Stamps Pretty Postage stamp and coordinating die for this card. I love the modern flowers in this set.

I stamped the image and colored it in with my Spectrum Noir Tri-blend markers. I chose the colors to match the Honey Bee Spring Fling papers. I die cut the image with the coordinating die and added some white gel pen detailing, wink of Stella and glossy accents to the flowers, leaves and hearts.

I stamped the sentiment from the same set onto the 'envelope' on the image.

Like Kelley, I embossed the cardstock background panel. I wanted to wet my cardstock a bit before embossing to stop it cracking, and so used some old shimmer mist from my stash - it gives it a little extra sparkle up close. I used Hero Arts Woodgrain Fancy die for this. 

I felt that the image would look better on a square card, and so made a card base measuring 5" x 5".
The pink patterned paper is cut to 4.75" x 4.75", the white patterned paper is cut to 4.25" x 4.25" and the embossed cardstock panel is cut to 4" x 4".

I popped up the image on some tape.

I love how this turned out and can't wait for the next card class!

Thanks for looking!
Happy crafting :D

Pretty Postage | 4x4 Stamp Set Pretty Postage | Honey Cuts Paper Pad 6x6 | 24 Double Sided Sheets | Spring Fling


Hero Arts Challenge blog

A Blog Named Hero has merged with the Stay Crafty with Hero challenges! They are looking for a design team of these challenges so I figured - why not?? I am now settled in my new house, my crafting supplies are mostly organized (as much as they ever will be! Lol!) and I always love a good challenge. 


Here are the cards I made for my application.

This first card is my favorite! I love the navy/silver color combo and I love to read!


I stamped some navy cardstock using the Novel Prose Bold Prints background stamp and weathered wood distress oxide ink. Once it had dried, I cut a 2" panel and used a tab top punch from Dress my Craft to turn it into a bookmark.
I die cut the images using the Looking Glass Paris dies. I cut them from silver cardstock and added these to the bottom of the bookmark to make a scene. I finished off the bookmark mark with some ribbon and twine from my stash.
I made a standard slimline card base from navy card base. I added a vellum panel measuring 3.25" x 8" and also a white cardstock panel measuring 3" x 7.75". I stamped the sentiment from the Literary Quotes stamp set, using Versamark ink and then heat embossed it with silver embossing powder. 
I finished off the card by adding foam tape to the back of the bookmark and centering it onto the card.

For my next design I created another slimline card.


I started out stamping the Circle Pattern Bold Prints background onto some white cardstock using Versamark watermark ink. I then heat embossed it with fine white embossing powder. I then used Mama Elephant's Slim Card basics die to cut out the panel - I love the stitching around the outside.
I used the Alignment Tool Slimline stencil over the panel and ink blended cocoa, red royal, pale tomato and fresh peach inks to create an ombre block background. I adhered this panel onto a Kraft Cardstock panel measuring 3.125" x 8.125", and then onto a standard white slimline card base.
I stamped the images from the Kittens in Kimonos stamp set - I love these adorable kittens! I used my Spectrum Noir Tri-color blending pens to coordinate with the ink blended background. I added a little white gel pen detailing to the images.
The sentiment was from the Sending Smiles stamp set. Stamped in watermark ink on black cardstock and then heat embossed with fine white embossing powder. I used a banner die from Whimsy Stamps to cut it out.
The sentiment and one of the kittens were adhered to the card, along with the outer 2 kittens popped up on foam tape.

I then decided to play with my Glimmer Hot Foil machine. I have watched so many YouTube videos I should be an expert by now! 


I used the Flower Garden Fancy die with my hot foil machine. I foiled it with Moondust glimmer foil onto black cardstock. This card was heavily inspired by Jennifer McGuire!
I cut the panel in half and found some cardstock in my stash to find a coordinating colored cardstock.
I cut a white cardstock panel measuring 4" x 5.25" and added the hot foiled panel and colored cardstock strip onto it.
I stamped the sentiment from the Sending Smiles stamp set - as you can see this is one of my favorite sentiment stamps for many occasions.
I popped up the panel with fun foam onto a standard A2 white card base. Love the clean and simple look.

I love CAS style cards and the white on white card designs.


For this card I used a linen cardstock for a little subtle texture. 
I die cut the Watering Can & Fancy Flowers from more linen cardstock. I used fresh peach ink to give a little color to the flowers. I added green ink to the leaves (whatever was left on my blending brush!) The watering can die cut a little slit in the top of the can to allow you to slide in the flowers and leaves.
I used the Square Infinity dies to cut a frame for the background and adhered this onto a standard A2 white textured card base.
I stamped the sentiment from the Sending Smiles sentiment stamp set and heat embossed it with silver embossing powder.
I finished off the card by popping up the watering can with foam tape.

My last card is a little more modern in design.


I used the ink cubes red royal, pale tomato and fresh peach to 'swipe' across a white cardstock panel.
Once the inks had dried, I stamped the flowers and sentiment using the Line Art Flowers stamp set. I then heat embossed them using clear embossing powder.
I added white gel pen detailing to the flowers and sentiment to help them to pop off the background.
I couldn't find any coordinating red cardstock in my stash so used the red royal ink cube to color the edges of another panel. The panels were die cut using the Nesting Rectangles Infinity dies.
I added the white panel onto the inked panel, and then onto a standard A2 white card base.

So I had lots of fun creating these cards, and lots more ideas swimming around in my head!

I can't wait to join in with the new challenges (as DT member or entrant) and look forward to the next Stamp-Along!

Thanks for looking.
Happy crafting :D

CG839 Novel Prose Bold Prints DI885 Looking Glass Paris (E) CM524 Literary Quotes 

CG799 Circle Pattern Bold Prints HT207 Alignment Tool Slimline Stencil CM443 Kittens in Kimonos

CM335 Hero Greetings Sending Smiles DI596 Flower Garden Fancy Die (E) DI714 Watering Can and Flowers Fancy Dies (E)

DI713 Square Infinity Dies (H) CM534 Line Art Flowers DI198 Nesting Rectangle Infinity Dies (H)


Thursday, January 27, 2022

I Love You...more than chocolate

 I finally got chance to play along with my new Gerda Steiner stamps this week! Thought this image would make a perfect Valentine's Day card for my hubby! I used the Gerda Steiner 'More than Chocolate' stamp set for my card.


I started by creating an ink blended background panel. I used Simon Says Stamp Tumbling Hearts stencil, along with some Gina K Lovely Lavender dye ink. I die cut the panel using Queen & Co stitched rectangles;e, and then added some more lavender ink gently over the panel - it looked a little stark with the lavender hearts against the white background.

Once the panel had dried fully, I stamped the sentiment from the More than Chocolate stamp set using Versafine Clair Onyx black ink. I then embossed this with clear embossing powder to make it 'pop'!

I added the panel to a standard A2 white card base.

I stamped out the image and colored him in with my Spectrum Noir Tri-blend markers. I fussy cut him out and popped him up on my card panel with some foam squares.

Inside the card it reads 'more than chocolate'!

I am entering this card into the monthly Share Your Designs Challenge over at Gerda Steiner Designs - I love how this turned out.


Share your Design Challenge - January 2021


Thank for looking!

Happy crafting :D


More Than Chocolate 3x4 Clear Stamp Set - Clearstamps - Clear Stamps - Cardmaking- Ideas- papercrafting- handmade - cards-  Papercrafts - Gerda Steiner Designs

AAA cards - No Layers + Big Sentiment challenge


 I love the current AAA Cards Challenge - 'No Layers + Big Sentiment'.

I looked through my stamps to see what big sentiment stamps I had. I found this stamp set from Simon Says Stamp 'Luck & Hugs' (now retired).


I used Simon Says Stamp Daisy Bouquet stencil, along with Gina K ink cubes (Passionate Pink, Dusty Rose, Innocent Pink) to add some interest to the bottom left corner of the card.

I stamped the large sentiment over the top in Versafine Clair Onyx Black ink. Because the word is not solid, it got lost on the background. I used my Spectrum Noir Tri-Blend markers to match the ink colors and color in the letters. You can still see the stenciling behind the colored letters, but it gives it enough of a pop to stand out.

Thanks for looking!
Happy crafting x

Simon Says Stamp Stencil DAISY BOUQUET ssst121470 Lucky To Know You Preview Image